- PRODUCTSFREEWAREFOR COMMERCIAL USEFOR PERSONAL AND BUSINESS USEBackup and System Restore:PC Privacy and Security:
- BUY ONLINE
- DISTRIBUTION
-
Automatic RAID Parameter Detection


R-Studio enables you to recover data from a failed RAID by creating a virtual RAID. Once a virtual RAID is mounted, R-Studio can recover data from the volume using the same powerful data recovery technology that is used on other disks and volumes. However, the challenge lies in constructing a valid virtual RAID from its constituent disks. Although you may have the correct disks (either physical drives or images) for the RAID, you may not immediately know the parameters for the RAID volume being recovered.
Choosing the correct RAID parameters is crucial to successfully mounting the virtual RAID, and therefore it is essential to a successful RAID data recovery. Oftentimes, RAID parameters may be ambiguous or completely unknown. There are some methods for manually finding RAID parameters (see the article "Finding RAID Parameters"), but manual RAID parameter detection requires a good understanding of RAID technology, file system features and other technical concepts. This makes finding RAID parameters very challenging, even for professional R-Studio users.
To help with this task, R-Studio has introduced its own unique technology for automatic RAID parameter detection. Using it, R-Studio can detect RAID parameters for any file system on a RAID volume, even if the RAID parameters are completely unknown to the user. Utilizing this technology does not require technical expertise about RAID volumes, but understanding a few key software principles about R-Studio's RAID parameter detection will greatly increase your chances of a successful RAID data recovery.
In this article, we will cover a few general notes about using R-Studio's automatic RAID detection. Then, we will illustrate these points by walking through an example operation. Lastly, we will address a few additional steps that can be performed to determine RAID configurations for complex data recovery scenarios.
General Notes
Regardless of the data recovery scenario, a few key points should be observed before attempting to automatically detect RAID parameters.
- All RAID disks or their images must be included in the RAID layout. If even one disk is missing, RAID parameter detection cannot be performed. This is true even if the disk is substituted with a "missing disk” object. The only exception is a spare disk without RAID data; spare disks may be excluded from the RAID layout without impacting the chances for a successful RAID parameter detection.
- Including spare disks in a virtual RAID layout is optional. As mentioned above, when building a virtual RAID, spare disks are not required for RAID parameter detection. Including them will not increase or decrease your success rate, but they will impact the time required to process the RAID. If you are certain that a disk is a spare disk without any RAID data, you can safely exclude it from your virtual RAID. If you are unsure, include all disks and expect longer processing times.
- RAID parameter detection may be a very lengthy process, especially for large RAIDs. Some patience will be required. R-Studio shows progress for RAID parameter detection to give you an estimated time to completion.
- RAID parameter detection may not always be successful. Success depends on many factors. The most important factors are the data types stored on the RAID and the extent of the damage to the volume. Data compression also has an impact: the less the data is compressed, the higher the chances that RAID parameters will be detected correctly. For example, parameters for RAIDs with Microsoft Office or OpenOffice documents, uncompressed images (*.bmp), databases, etc., have greater chances for successful detection than RAIDs with compressed images (*.jpg, *.TIFF, *.png) and videos. Also, residual data from previous RAIDs still remaining on the RAID disks may severely degrade performance of RAID parameter detection.
If necessary, the RAID parameter detection operation may be repeated several times.
Basic Automatic RAID Parameter Detection
This example illustrates an automatic RAID parameter detection using a simple case. For a scenario like this one, the process is easy and straightforward.
These steps presume a basic familiarity with R-Studio's functionality. For further information or guidance, refer to the online R-Studio Help: Finding RAID Parameters.
1. Create a virtual RAID object and add its objects to it. Disregard the disk order, RAID type, block size, etc. Then, click the Auto Detect button.
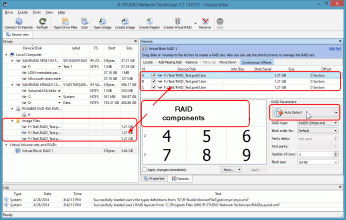
Fig.1. RAID components
Click image to enlarge
2. R-Studio will start the automatic detection process, showing its progress. When it finishes, the RAID Parameters Detection - Completed dialog box will show the results.
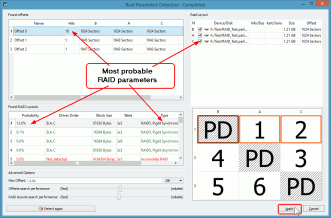
Fig.2. Detected RAID layouts
Click image to enlarge
R-Studio will automatically select the best variant found.
Please note that in some unusual cases, there may be a difference between the initial and final detected offsets. This is a normal situation and does not affect RAID parameter detection.
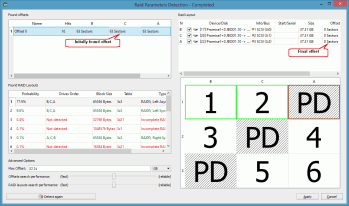
Fig.3. Difference between the initial and final detected offsets
Click image to enlarge
3. Click the Apply button on the RAID Parameters Detection - Completed dialog box, and the selected RAID layout will be applied to the virtual RAID.
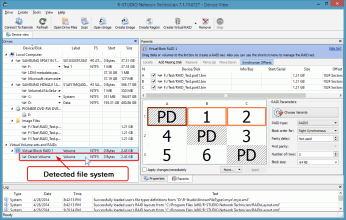
Fig.4. Re-constructed RAID layout
Click image to enlarge
4. Preview files to verify the correct parameters were detected. If a valid file system is detected on the RAID, R-Studio will show it. To verify that the correct RAID parameters were detected, you can open the volume and preview some of the files.
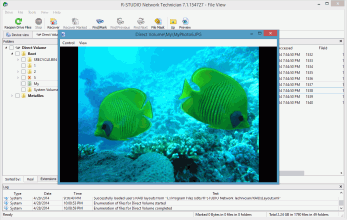
Fig.5. Previewed file on a correctly re-constructed RAID
Click image to enlarge
Next Steps: What to do if R-Studio cannot detect RAID parameters after the first attempt
There are a number of reasons why R-Studio may not detect RAID parameters correctly after the first attempt. In some cases, the data may be damaged too heavily for automatic RAID parameter detection to be possible. But if the data is more or less intact, there are a few techniques that may help R-Studio detect the correct parameters.
Scan the RAID
Scanning the Virtual Block RAID may help when R-Studio detects apparently correct RAID parameters, but cannot find a valid file system on the detected RAID. This is especially helpful when the space on the RAID components before the offset is filled with 0s. In this case, R-Studio might detect the offset incorrectly for the first time.
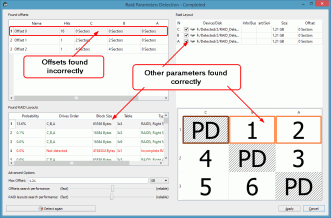
Fig.6. Incorrectly found offset for the RAID
Click image to enlarge
When this occurs, R-Studio may not find a valid file system on the RAID. The Virtual Block RAID volume will appear in the Drives pane, but there will be no detected file systems beneath it.
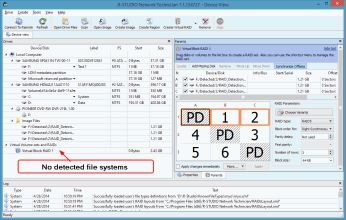
Fig.7. No detected file systems
Click image to enlarge
In this case, the file system can be found by scanning the RAID. Select the Virtual Block RAID item and click Scan. The detected file systems will be shown beneath the Virtual Block RAID disk.
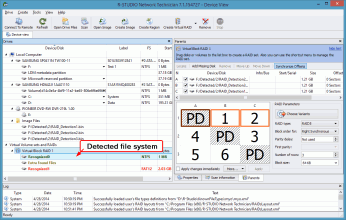
Fig.8. Detected file system after RAID scan
Click image to enlarge
Change RAID Detection Parameters
The default RAID detection parameters are calibrated to deliver the most reliable results for the widest range of cases. There are two advanced parameters that can be adjusted as needed: "Offset search performance" and "RAID layout search performance". Adjusting these lowers the threshold for the found offsets or found RAID layouts that are displayed in the results. By default, only the results most likely to be the correct parameters are shown. However, for more complex RAID layouts (for example, RAID 6), the default parameters may filter out the correct offsets or RAID layouts. You can expand the results displayed by decreasing the "Offset search performance" and "RAID layout search performance" parameters by moving the slider toward the "fast" setting.
In the figure below, the default settings were used, and no offsets were detected.
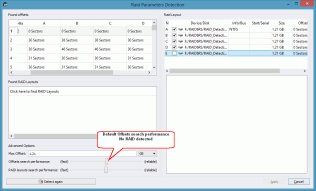
Fig.9. No offsets detected with the default detection parameters
Click image to enlarge
After decreasing the "Offset search performance" parameter in the Advanced Options pane and detecting again, the correct offset is found.
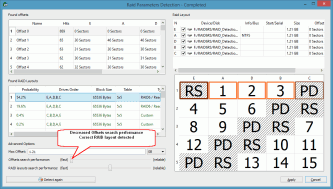
Fig.10. A correct offset is detected when the "Offset search performance" parameter is decreased
Click image to enlarge
Similarly, the "RAID layouts search performance" parameter can be decreased to find more RAID layouts.
Note that the default settings should be attempted first. For less complex RAID layouts, decreasing either of these settings will display too many results, making determining the correct layout more time consuming.
Select another offset and RAID layout manually
This may help when the RAID data is damaged to the point that none of the above steps yield successful results.
Starting with the offset with the highest number of hits, manually select the offset and repeat the detection. Then, manually select a RAID layout with the highest probability. Continue this process of elimination until the correct RAID parameters are found.
Conclusion
Recovering data from a failed RAID is a challenge. Detecting the correct RAID parameters is key to a successful recovery. The absolute best case scenario is one where the previous RAID configuration was stored or recorded prior to the crash. Barring that, using R-Studio's built-in automatic RAID parameter detection technology is the next best course of action. R-Studio's automatic RAID parameter detection works with very high reliability for simple cases, and for more complex situations, can be used as a powerful tool for determining the correct RAID offset and RAID layout.
- Data Recovery Guide
- Why R-Studio?
- R-Studio for Forensic and Data Recovery Business
- R-STUDIO Review on TopTenReviews
- File Recovery Specifics for SSD devices
- How to recover data from NVMe devices
- Predicting Success of Common Data Recovery Cases
- Recovery of Overwritten Data
- Emergency File Recovery Using R-Studio Emergency
- RAID Recovery Presentation
- R-Studio: Data recovery from a non-functional computer
- File Recovery from a Computer that Won't Boot
- Clone Disks Before File Recovery
- HD Video Recovery from SD cards
- File Recovery from an Unbootable Mac Computer
- The best way to recover files from a Mac system disk
- Data Recovery from an Encrypted Linux Disk after a System Crash
- Data Recovery from Apple Disk Images (.DMG files)
- File Recovery after Re-installing Windows
- R-Studio: Data Recovery over Network
- How To Use R-Studio Corporate Package
- Data Recovery from a Re-Formatted NTFS Disk
- Data Recovery from an ReFS disk
- Data Recovery from a Re-Formatted exFAT/FAT Disk
- Data Recovery from an Erased HFS Disk
- Data Recovery from an Erased APFS Disk
- Data Recovery from a Re-Formatted Ext2/3/4FS Disk
- Data Recovery from an XFS Disk
- Data Recovery from a Simple NAS
- How to connect virtual RAID and LVM/LDM volumes to the operating system
- Specifics of File Recovery After a Quick Format
- Data Recovery After Partition Manager Crash
- File Recovery vs. File Repair
- Data Recovery from Virtual Machines
- Emergency Data Recovery over Network
- Data Recovery over the Internet
- Creating a Custom Known File Type for R-Studio
- Finding RAID parameters
- Recovering Partitions on a Damaged Disk
- NAT and Firewall Traversal for Remote Data Recovery
- Data Recovery from an External Disk with a Damaged File System
- File Recovery Basics
- Default Parameters of Software Stripe Sets (RAID 0) in Mac OS X
- Data Recovery from Virtual Hard Disk (VHD/VHDX) Files
- Data Recovery from Various File Container Formats and Encrypted Disks
- Automatic RAID Parameter Detection
- IntelligentScan Data Recovery Technology
- Multi-pass imaging in R-Studio
- Runtime Imaging in R-Studio
- Linear Imaging vs Runtime Imaging vs Multi-Pass Imaging
- USB Stabilizer Tech for unstable USB devices
- Joint work of R-Studio and PC-3000 UDMA hardware
- Joint work of R-Studio and HDDSuperClone
- R-Studio T80+ - A Professional Data Recovery and Forensic Solution for Small Business and Individuals Just for 1 USD/day
- Backup Articles
- R-Drive Image Standalone and Corporate license transferring
- Backup with Confidence
- R-Drive Image as a free powerful partition manager
- Computer Recovery and System Restore
- Disk Cloning and Mass System Deployment
- Accessing Individual Files or Folders on a Backed Up Disk Image
- Creating a Data Consistent, Space Efficient Data Backup Plan for a Small Business Server
- How to Move the Already Installed Windows from an Old HDD to a New SSD Device and Create a Hybrid Data Storage System
- How to Move an Installed Windows to a Larger Disk
- How to Move a BitLocker-Encrypted System Disk to a New Storage Device
- How to backup and restore disks on Linux and Mac computers using R-Drive Image
- Undelete Articles
- Get Deleted Files Back
- Free Recovery from SD and Memory cards
- R-Undelete: Video Recovery
- Recovery from an External Device with a Damaged File System
- File recovery from a non-functional computer
- Free File Recovery from an Android Phone Memory Card
- Free Photo and Video File Recovery Tutorial
- Easy file recovery in three steps
Rating: 4.8 / 5
R-TT may not be the easiest or most user-friendly solution, but the algorithm used for the renaming saved me THOUSAND of hours of opening ...
Bought it and 100% recommend it for anyone with a similar issue.
I was reluctant as it seemed pricey compared to other programs, but damn worth every penny. It managed to even find files I thought were wiped from existence.
Kudos to r-tools, thank you!
I`m an IT professional who has worked from home for over a decade. Early on in my career, I configured an HP ProLiant Server (Raid 1+0) as a workstation that I would remote into from my laptop. As technology evolved, I began to use it only for email and as a config file repository.
A short while ago, one of the drives degraded, but the HP ProLiant Server (Raid 1+0) still functioned fine on the remaining drive. I was complacent and didn`t replace the ...