- PRODUCTSFREEWAREFOR COMMERCIAL USEFOR PERSONAL AND BUSINESS USEBackup and System Restore:PC Privacy and Security:
- BUY ONLINE
- DISTRIBUTION
-
Data Recovery from an ReFS disk


The ReFS file system (Resilient File System) was developed by Microsoft as a substitute for their current file system, NTFS. Initially introduced with Windows Server 2012, it was aiming at gradual migration to all Microsoft Windows operating systems - both desktops and servers. For the desktops, Windows 8.1 was the first Windows that supported this file system. The earlier Windows 10 editions could also work with ReFS, but then Microsoft started gradually discontinuing support for this file system from Windows 10. The ability to create ReFS volumes was removed in Windows 10's 2017 Fall Creators Update, and now it remains only in Windows Enterprise and Pro for Workstations editions. Microsoft continues support for ReFS in Windows 11 Enterprise, Education, and Workstation editions, and in their Server line.
Although ReFS has some features to help solve many internal file system issues, it still isn't completely prone to data loss - especially when such a loss is caused by human error. That's why data recovery from ReFS disks is an important feature in any professional data recovery software.
R-Studio is not an exception. All of its versions are able to recover data from ReFS storage devices.
Important Notes Before We Begin
This article only applies to ReFS formatted devices. If you need to recover data from other disks, see our other articles:
- From an NTFS disk (Windows): Data Recovery from a Re-Formatted NTFS Disk
- From an exFAT/FAT (Windows/macOS/Linux): Data Recovery from a Re-Formatted exFAT/FAT Disk
- From an HFS disk (Mac OS X): Data Recovery from an Erased HFS Disk
- From an APFS disk (macOS): Data Recovery from an Erased APFS Disk
- From an Ext2/3/4FS disk (Linux): Data Recovery from a Re-Formatted Ext2/3/4FS Disk
- From an XFS disk (Linux): Data Recovery from an XFS Disk
Your disk is in good physical condition
We presume that your disk is in good physical shape. If not, it's best to seek out the services of a professional data recovery specialist. Beyond checking that the cables are firmly connected, any "do it yourself" data recovery efforts may actually worsen your chances of recovering the data if your disk has a serious physical malfunction. Signs that a disk has a physical failure include:
- The system does not recognize the device at all, or it appears with an unusual or garbled name.
- A S.M.A.R.T. (Self-Monitoring, Analysis and Reporting Technology) utility warns that a severe hardware failure event has occurred. R-Studio can check S.M.A.R.T. conditions of your disk, and we explain how to do that below.
- The hard drive makes unusual noises, clicks, or takes a very long time to spin up and initialize.
- Bad blocks continually appear on the drive.
All these cases are best handled by qualified data recovery professionals. They have special equipment, software, and, most importantly, the required skills to work with such drives. Neither R-Studio nor other data recovery software will help you in such cases. Moreover, any further tampering with such a drive will surely inflict more damage to your data. Quite often, such damage will render the data completely irrecoverable.
- Before you begin, prepare a storage place large enough to store all recovered files. It may be any disk visible by the operating system including an external or network drive. Do not try to save the files on the disk from which you're going to recover them.
- If you haven't already, download and install R-Studio. Right now, it is not necessary to buy and register the program. R-Studio in its demo mode allows you to perform all the necessary data recovery operations, except saving the recovered files. This lets you see if it can successfully recover your files and therefore, if it's worth buying. You will not have to re-install or restart R-Studio to register it.
- Connect the disk to the R-Studio computer. Use the fastest interface available: the SATA ports are the fastest, but the speed of USB 3 is sufficient. USB 2.0 may be too slow for large disks. Please note that some external USB drives may have additional eSATA interfaces.
And one last reminder...
Do not write anything on the disk from which you're going to recover data! The new data may overwrite your old files, and you may lose them for good.
This article will discuss how to use it to recover data lost by two most common cases. The first case is data recovery from emptied system Trash. The second one is an accidental format of an ReFS partition into another ReFS partition.
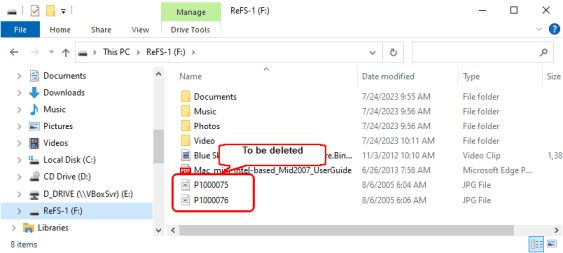
Case 1: Several files / folders were moved to Trash and then the Trash was emptied.
Click image to enlarge
Click image to enlarge
The task: To recover these files and folder.
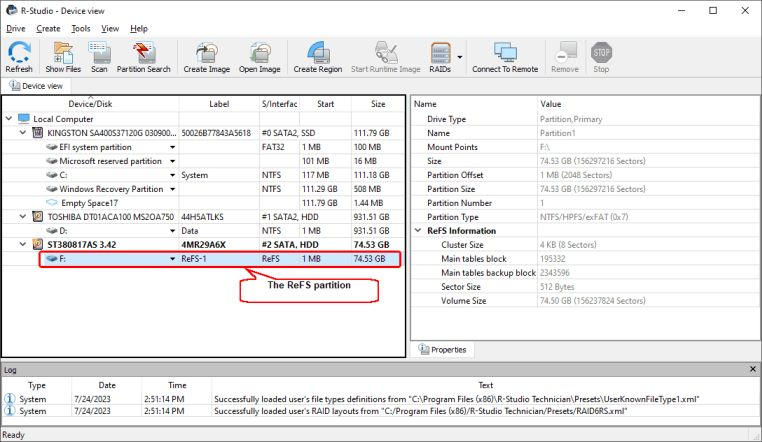
1. Run R-Studio and locate the disk with the ReFS partition.
Click image to enlarge
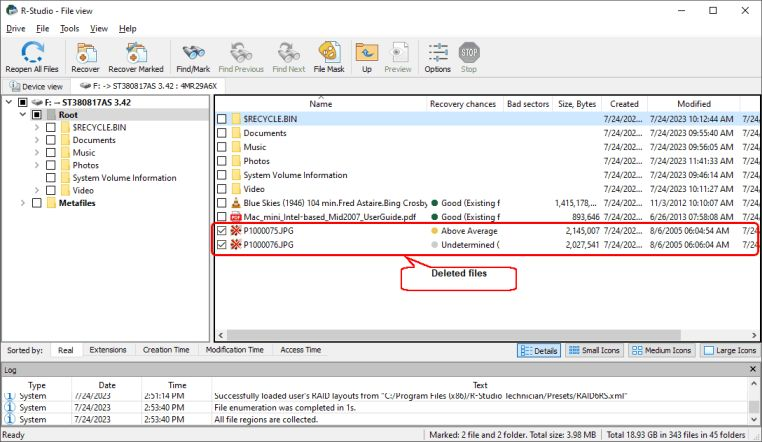
2. Enumerate files on the partition and inspect the file system in order to find the deleted files and folders.
Click image to enlarge
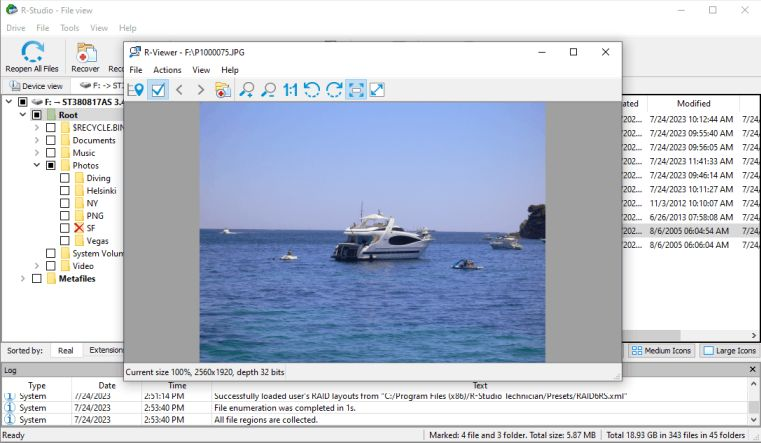
Two files deleted from the device root are immediately found in their original places. You can preview them to check their recovery chances. Double-click a file to preview it.
Click image to enlarge
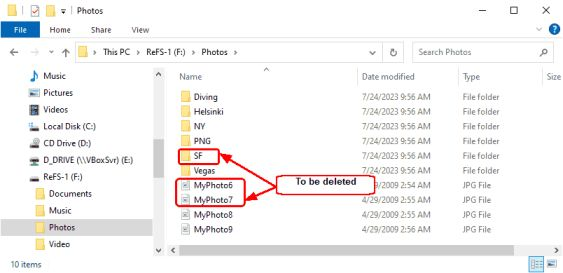
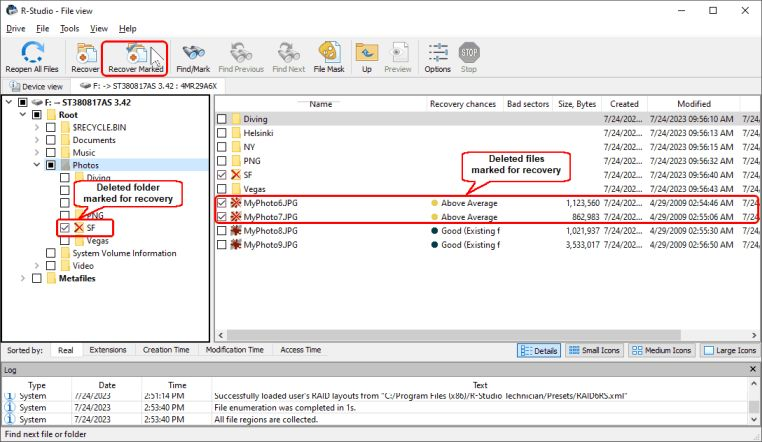
3. Locate other deleted files and folders.
Click image to enlarge
Next, mark found files and folders for recovery and click the Recover Marked button.
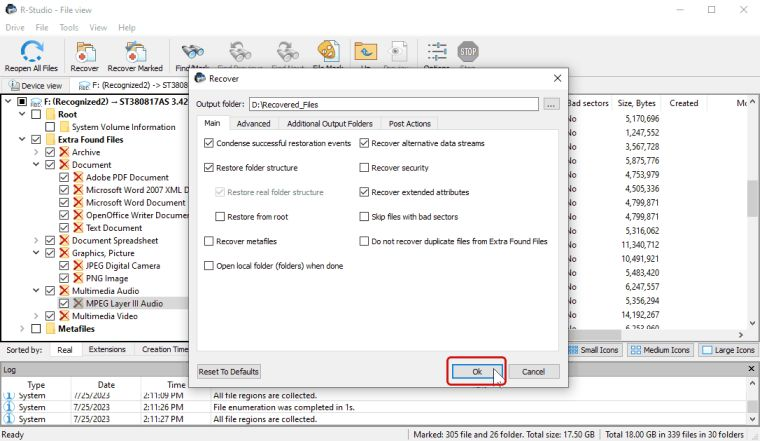
4. Specify the output folder and recovery parameters on the Recover dialog box and click the OK button.

Click image to enlarge
You can find more information about these parameters in R-Studio's online help: Basic File Recovery.
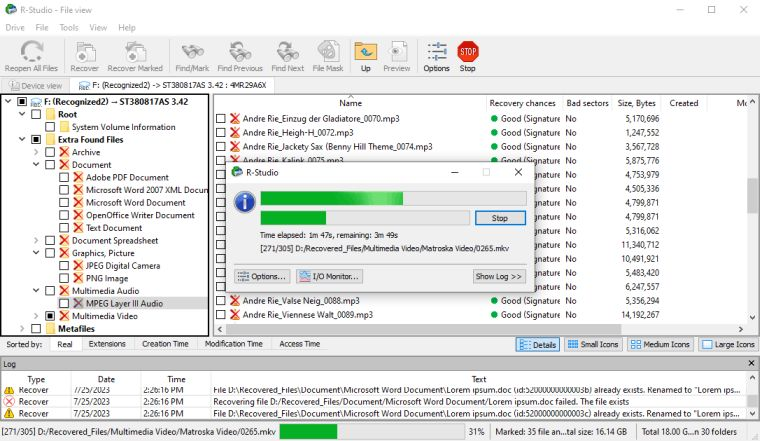
> R-Studio will start the data recovery process, showing its progress,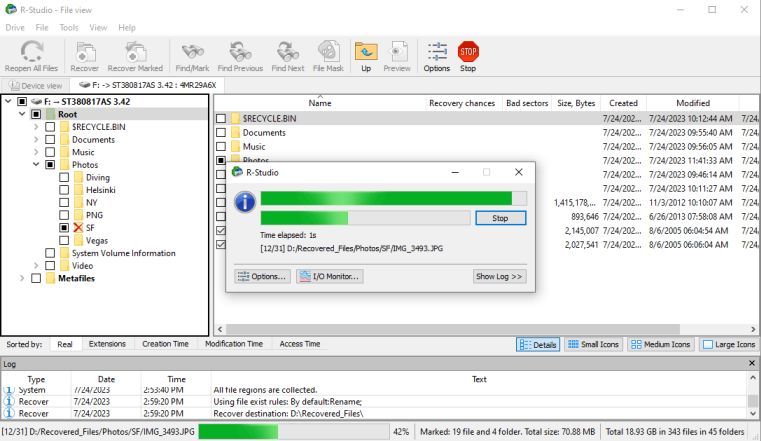
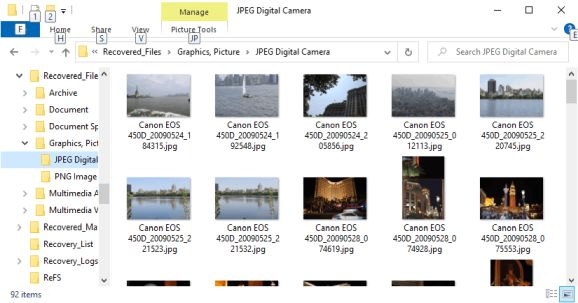
Click image to enlarge and when it's over, you can view your recovered files and folders in the Output folder.
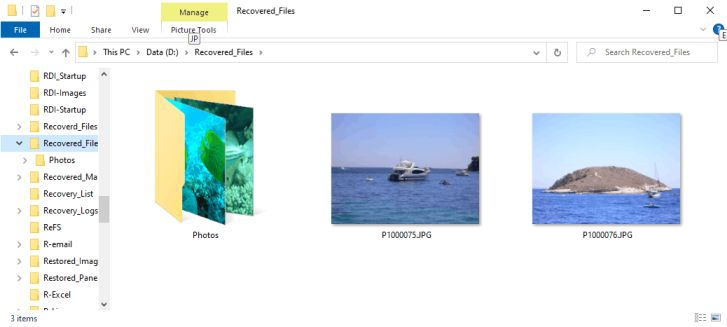
Click image to enlarge
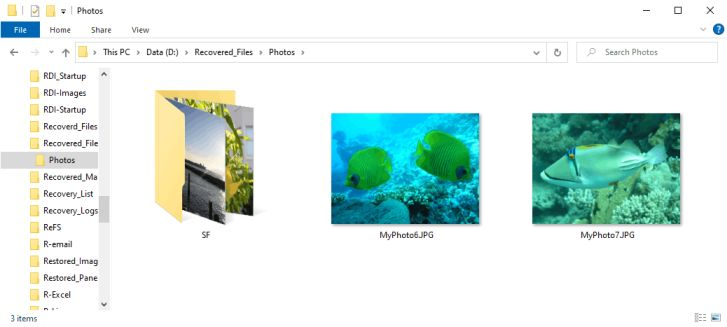
Click image to enlarge
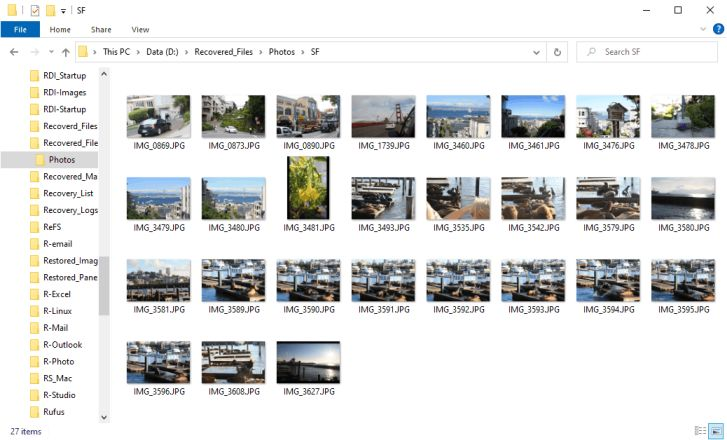
Click image to enlarge
Case 2: An existing ReFS partition was erroneously formatted into a new ReFS partition.
The task: To recover files from the lost partition and its entire folder structure, if possible.
1. Run R-Studio and locate the disk with the new partition.
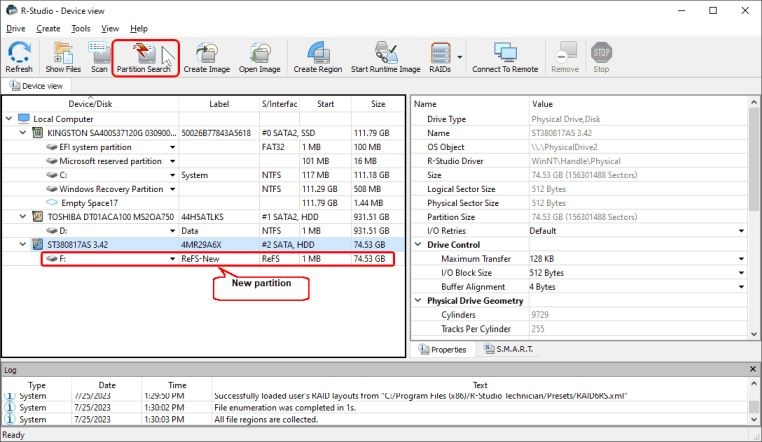
Click image to enlarge
First, we'll try to find the lost partition by using the fast search for partition option. Click the Partition Search button and wait for the results.
2. Locate the previous partition.

Click image to enlarge
3. Open this partition to inspect its content.
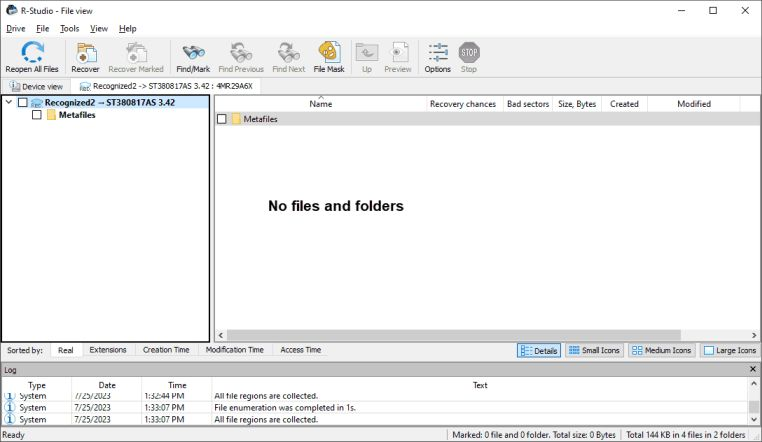
Click image to enlarge
Unfortunately, nothing is found on this partition. We have to continue disk scan in order to find either some remnants of the previous partition or raw files (Known File Types).
4. Return to the Device view tab, click the Scan button and specify scan parameters.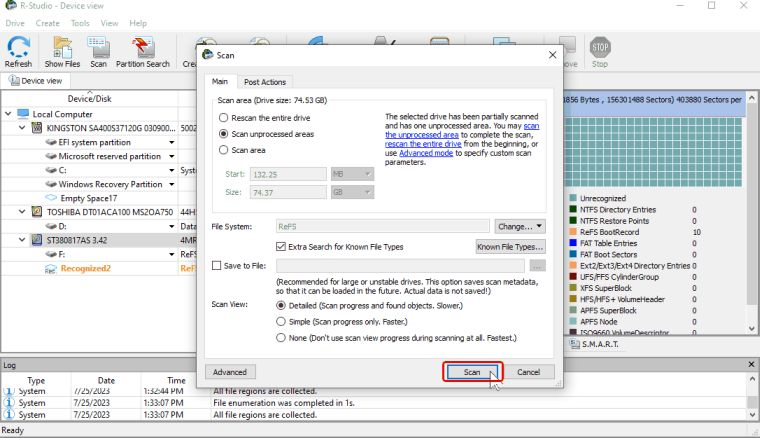
Click image to enlarge
Click the Change button for the File System field and leave only ReFS selected. You can also specify Known File Types (raw files) to search for, depending on the types of files resided on the lost partition. You can read more about these parameters in R-Studio's online help: Drive Scan.
It's also a good idea to save scan info, as it can be necessary to interrupt scan process and resume it later. The saved scan info can be loaded at a later date and the scan will be resumed from the point where it was interrupted.
Click the Scan button when you have specified all the necessary parameters.
> R-Studio will start scanning the disk showing its progress.
5. Inspect the scan results when the scan is over.
Click image to enlarge
6. Enumerate files on the scanned new ReFS partition by double-clicking it and inspect the results.
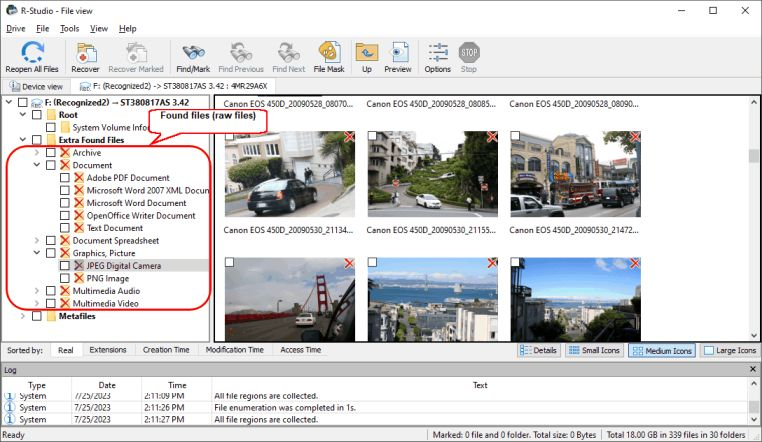
Click image to enlarge
Files from the previous partition could be found only by their signatures, therefore all their names, paths, and other attributes have been lost. R-Studio places such files to the Extra Found Files section and tries to use their internal tags to give them meaningful names. Unfortunately, the initial folder structure could not be recovered at all.
Once again, you may preview files to verify that the files aren't broken. Just double-click a file.
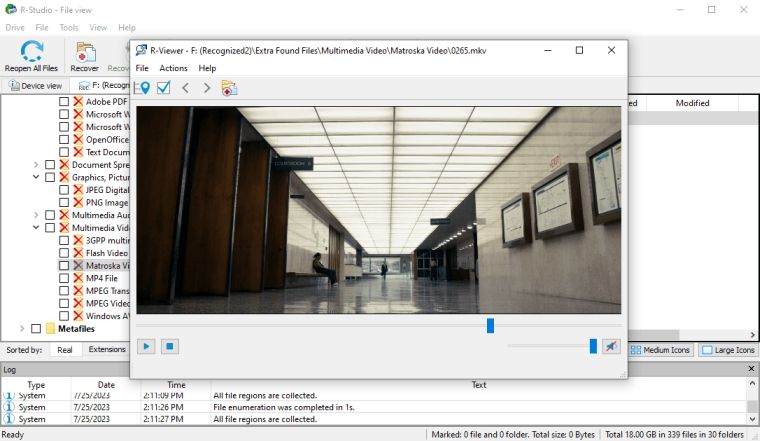
Click image to enlarge
7. Mark files for recovery and click the Recover Marked button.
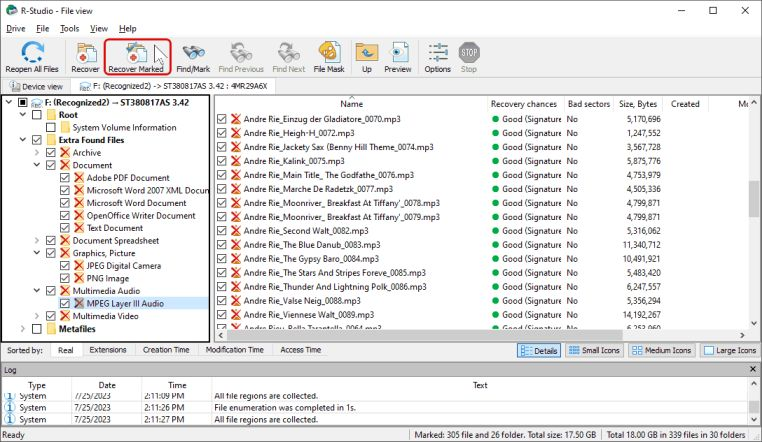
Click image to enlarge
8. Specify the output folder and recovery parameters and click the OK button.
Click image to enlarge
You can find more information about these parameters in R-Studio's online help: Basic File Recovery.
R-Studio will start file recovery showing its progress.
Click image to enlarge
You may see the recovered files when recovery is over.
Click image to enlarge
Conclusions
Tests in this article have shown that R-Studio can be used to recover data from ReFS disks. In the first case (deleted files) all files and folder have been successfully recovered. In the second case (disk format) all files have been successfully recovered, but as raw files, that is, without their names and other attributes. The entire folder structure has not been recovered at all due to the fact that the metadata of the new partition has been written over the metadata of the old partition.
You may perform all these steps in the demo mode to R-Studio, that is, without buying it. If you can successfully find and preview lost files, you can register your copy of R-Studio and save the recovered files.
- Data Recovery Guide
- Why R-Studio?
- R-Studio for Forensic and Data Recovery Business
- R-STUDIO Review on TopTenReviews
- File Recovery Specifics for SSD devices
- How to recover data from NVMe devices
- Predicting Success of Common Data Recovery Cases
- Recovery of Overwritten Data
- Emergency File Recovery Using R-Studio Emergency
- RAID Recovery Presentation
- R-Studio: Data recovery from a non-functional computer
- File Recovery from a Computer that Won't Boot
- Clone Disks Before File Recovery
- HD Video Recovery from SD cards
- File Recovery from an Unbootable Mac Computer
- The best way to recover files from a Mac system disk
- Data Recovery from an Encrypted Linux Disk after a System Crash
- Data Recovery from Apple Disk Images (.DMG files)
- File Recovery after Re-installing Windows
- R-Studio: Data Recovery over Network
- How To Use R-Studio Corporate Package
- Data Recovery from a Re-Formatted NTFS Disk
- Data Recovery from an ReFS disk
- Data Recovery from a Re-Formatted exFAT/FAT Disk
- Data Recovery from an Erased HFS Disk
- Data Recovery from an Erased APFS Disk
- Data Recovery from a Re-Formatted Ext2/3/4FS Disk
- Data Recovery from an XFS Disk
- Data Recovery from a Simple NAS
- How to connect virtual RAID and LVM/LDM volumes to the operating system
- Specifics of File Recovery After a Quick Format
- Data Recovery After Partition Manager Crash
- File Recovery vs. File Repair
- Data Recovery from Virtual Machines
- Emergency Data Recovery over Network
- Data Recovery over the Internet
- Creating a Custom Known File Type for R-Studio
- Finding RAID parameters
- Recovering Partitions on a Damaged Disk
- NAT and Firewall Traversal for Remote Data Recovery
- Data Recovery from an External Disk with a Damaged File System
- File Recovery Basics
- Default Parameters of Software Stripe Sets (RAID 0) in Mac OS X
- Data Recovery from Virtual Hard Disk (VHD/VHDX) Files
- Data Recovery from Various File Container Formats and Encrypted Disks
- Automatic RAID Parameter Detection
- IntelligentScan Data Recovery Technology
- Multi-pass imaging in R-Studio
- Runtime Imaging in R-Studio
- Linear Imaging vs Runtime Imaging vs Multi-Pass Imaging
- USB Stabilizer Tech for unstable USB devices
- Joint work of R-Studio and PC-3000 UDMA hardware
- Joint work of R-Studio and HDDSuperClone
- R-Studio T80+ - A Professional Data Recovery and Forensic Solution for Small Business and Individuals Just for 1 USD/day
- Backup Articles
- R-Drive Image Standalone and Corporate license transferring
- Backup with Confidence
- R-Drive Image as a free powerful partition manager
- Computer Recovery and System Restore
- Disk Cloning and Mass System Deployment
- Accessing Individual Files or Folders on a Backed Up Disk Image
- Creating a Data Consistent, Space Efficient Data Backup Plan for a Small Business Server
- How to Move the Already Installed Windows from an Old HDD to a New SSD Device and Create a Hybrid Data Storage System
- How to Move an Installed Windows to a Larger Disk
- How to Move a BitLocker-Encrypted System Disk to a New Storage Device
- How to backup and restore disks on Linux and Mac computers using R-Drive Image
- Undelete Articles
- Get Deleted Files Back
- Free Recovery from SD and Memory cards
- R-Undelete: Video Recovery
- Recovery from an External Device with a Damaged File System
- File recovery from a non-functional computer
- Free File Recovery from an Android Phone Memory Card
- Free Photo and Video File Recovery Tutorial
- Easy file recovery in three steps
Rating: 4.8 / 5
R-TT may not be the easiest or most user-friendly solution, but the algorithm used for the renaming saved me THOUSAND of hours of opening ...
Bought it and 100% recommend it for anyone with a similar issue.
I was reluctant as it seemed pricey compared to other programs, but damn worth every penny. It managed to even find files I thought were wiped from existence.
Kudos to r-tools, thank you!
I`m an IT professional who has worked from home for over a decade. Early on in my career, I configured an HP ProLiant Server (Raid 1+0) as a workstation that I would remote into from my laptop. As technology evolved, I began to use it only for email and as a config file repository.
A short while ago, one of the drives degraded, but the HP ProLiant Server (Raid 1+0) still functioned fine on the remaining drive. I was complacent and didn`t replace the ...